It has been far too long since I’ve had a chance to sit down and blog! That doesn’t mean I haven’t been sewing – just more work sewing than fun sewing.
If you follow me on Twitter or Instagram, you’ve seen little bits of what I’ve been up to since I tend to update daily. And you don’t need an account to view what I post there.
At the beginning of January, I decided my sewing room needed a major cleaning/reorganizing. I spent a couple of weeks rearranging the furniture in my sewing room and adding a few new pieces. I think it will really be more efficient in the long run. (More on that to come in a later post.)
I got about 90% finished with the reorg and then I started getting back-to-back jobs and the last 10% has been taking the longest to finish.
But before I got work-busy, I did manage to build myself a new ironing table! Yes, table! No more wimpy ironing board for me! You might recall that I’ve been using the square end of my ironing board and ignoring the pointed end for years.
I’ve always loved the large tables set up in costume shops where I’ve worked (there are usually multiple irons sharing one large surface). It was high time I had my own personal table at home!

My new ironing table!
And because I know all of you who sew will want one for yourself, I took lots of photos so you can make one too. =)
I started with a NORDEN sideboard from IKEA:
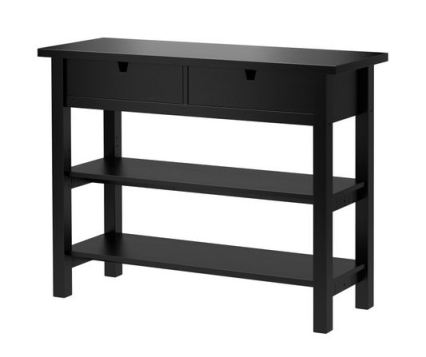 I’m not sure how long IKEA’s carried this, but I just noticed it recently. It was exactly the size/height I’ve been looking for to use as an ironing table base, and it is solid wood. Plus, it even had the bonus of drawers and shelves!
So for $149.00, I had the perfect table base and I didn’t have to engineer anything from scratch. (I still find it amusing that the least expensive large piece of furniture in my sewing room is the cutting table!)
The dimensions of the NORDEN sideboard are 47½” long x 16½” wide x 35⅜” tall. The height was perfect but the top surface was a little small. I needed something that wasn’t too big and would fit along the wall where I already had my ironing board without blocking the closet door.
First, I constructed the sideboard table exactly as the IKEA comic book instructed because I had come up with my own simple plan to make the surface bigger without having to alter the original design.
I wanted a surface area that was significantly larger than my ironing board, which measures 13½” wide x 53” long (to the narrow pointed end). I decided 60” long would be a decent size to fit my space while still being long enough to iron fabric yardage in one pass from selvage to selvage.
I also determined that 19” wide would not take up too much space in my room – I had to be careful not to make my sewing room feel crowded with the other furniture rearranging.

Norden sideboard assembled and placement determined in my sewing room.
Then, my husband and I went shopping to buy some supplies at the home improvement store:
- 1 piece of 19” x 60” plywood ¾” thick (we bought a full 4’ x 8’ sheet but had the store cut it to size)
- 2 square dowels 1” x 36” each
- 10 flat headed Phillips machine screws size #6 – 32 x 2 in
- 10 nuts to fit the #6 machine screws (ours came in packs with the screws)
- 10 flat washers size #6

Plywood rectangle cut to finished size, two square dowels, and hardware.
We already had these but you will also need:
- Drill
- 1 wood drill-bit 5/32”
- Measuring tape or yardstick
- Staple gun & ½” staples
- Hammer
- Screwdriver
- Adjustable crescent wrench or socket wrench (to fit nuts)
- Nail setter or a piece of flat metal you can hammer to completely set the staples
- Any kind of (power or hand) saw that can cut 1’ square dowels
- Gloves (recommended for handling the plywood)
- Safety glasses/goggles
We cut each square dowel into 3 pieces measuring 3”, 14.5”, and 18.5”. The small 3” pieces were a good size to keep the dowels from blocking the drawers on the front of the sideboard. Exact size is not important as long as you are able to frame each corner of the existing tabletop with the dowels.
We turned the IKEA unit upside down, placed it on the plywood top, and marked it so the base would be centered on the plywood lengthwise. (Note: make sure you remove the adjustable shelf before turning table upside down!) We offset the sideboard table a little closer to the front edge so that the dowel would be flush with the edge of the plywood (thus, prettier and easier to cover).
Then we put some extra plywood scrap on the floor underneath everything. This was so we could drill all the way through the plywood top without worrying about drilling into the carpet beneath.

A spare piece of ¾” plywood protected the carpet from the drill nicely.
Starting with the two small front dowels, we butted them up to the edge of the sideboard and drilled one hole all the way through the dowel and the first layer of plywood that would be the new top.
Then we unstacked everything and put bolts through from the top (the part that was facing the floor while drilling) and attached them with washers and nuts on the dowels on the bottom.
After that, we did the same with one dowel on one side – drilling one hole on each end because this piece of dowel was longer.
We continued drilling, unstacking, and attaching one dowel at a time so we could make sure everything fit perfectly and would be tight around the sideboard.

Last dowel drilled!
Finally, we had the dowel frame all attached. It didn’t matter that the bolt heads weren’t perfectly flush with the top surface because I knew the padding I would be putting over everything would smooth any height difference out. As long as the dowels were secure on the plywood, it was perfect.

Dowel frame completely attached.
I initially had plans to secure the plywood top to the IKEA sideboard after covering it with appropriate ironing fabric, but it ended up fitting so snuggly we didn’t need to. For once, one of my crazy IKEA hacks actually turned out to be less complicated than originally planned! Win!

My NORDEN has a bigger top!

Here’s a size comparison of my new ironing table to my old ironing board.
You may have noticed I was able to move my fabric tubes from under my cutting table to under my new ironing table. This was perfect because with my new furniture arrangement, the tubes were a little more in the way under the cutting table.
Next came the hard part: waiting for specialty fabric to come in the mail so I could cover the plywood top.
The best ironing tables in costume shops are covered in a drapery interlining fabric called English bump cloth. I read somewhere (apparently I failed to save the link) that it was first used as a curtain interlining for British royalty in order to better insulate palaces from the cold and damp.
Bump cloth is a thick, somewhat flannel-like fabric that adds body and structure to fancy drapes.

English bump cloth fabric.
I found some at Fabric.com in my first search and placed an order. Even though the website said there was around 40 yards in stock at the time, I received an email a couple days later saying they were sold out. Grrr. (I have had such rotten luck with Fabric.com completely filling my last few orders!) If you feel like taking a chance with them, here’s the link for their Hanes Drapery Interlining Bump Cloth listed as item #UK-528.
Once I learned I wouldn’t be receiving my first order of bump cloth, I started looking elsewhere. I eventually found some at BuyFabrics.com and it was less expensive than Fabric.com’s! I quickly ordered 2 yards (I was planning to use two layers to cover my plywood top) and they shipped within 24 hours! Here’s their link for English Classic Bump Natural Interlining.
While I waited for my bump cloth, I went to my local JoAnn Fabrics and purchased 2 yards of aluminum coated ironing board fabric in their utility fabric section. (You can also buy it on their website.) I knew I wanted another silver ironing surface like I had on my ironing board before because it looks better for longer. Most costume shops cover their ironing tables in muslin, but leakage from irons stains muslin.

Ick! stained muslin on a costume shop ironing table. My silver cover never stained so visibly in all the years I had it despite an occasional iron pee.
As of yesterday, Fabrique! (the little fabric store where I work part-time) also started carrying silver ironing board fabric! You can order it from the website as well. From what I can tell, this fabric might have a slightly heavier muslin backing for the aluminum than what JoAnn sells. Too bad I wasn’t able to buy it from work when I needed some!
Finally, my bump cloth arrived and I could finish my ironing table!
The following steps can be used to cover any wooden table surface to create an ironing table if you already have a piece of furniture and don’t want to buy a NORDEN sideboard.

I cut two strips of bump cloth slightly wider and longer than the plywood top and laid them pebbled side down (slightly ribbed/striped side up) on a paper covered work space on the floor. Then I placed my plywood tabletop on top of the fabric.

Then I folded and stapled both layers of the bump cloth (at the same time) to the plywood, starting with one long side and then attaching the opposite side to make sure it was tight. The handle end of a metal nail setter allowed me to hammer staples all the way down along the dowel edges. After securing the long sides, I neatly folded the corners and stapled the rest into place.
I discovered, even after pulling the bump cloth tight, there was still too much slack when I rubbed the top surface. So I pushed the extra up toward the front of the tabletop while my husband held and spring clamped the excess in place.

To correct the slack, I pushed the extra fabric to the front edge and stapled it down. Then I moved the extra fold of fabric to the underside. This ended up working well because there was no dowel across the front and the little ridge of extra fabric created a nice little lip to mask the front edge of the sideboard top.

I used scraps of bump cloth to cover the nuts and screw ends so nothing could catch on them while I ironed later. Then I covered everything tightly with a layer of silver ironing board fabric stapled on through all the layers.
Once the plywood top was completely covered, we just pushed it in place on the sideboard. It fits nice and snug. If I ever need to recover it, I can just take the top off and change out the fabric that needs to be replaced. Super easy. =)
I love my new ironing table!
Bonus: I no longer need to iron yardage in steps before I roll it – I can roll as I iron! And all my ironing tools fit in one drawer while my press cloths & ironing products (aside from interfacing) all fit in the other drawer. I chose to hook my sleeve board over the right edge of the tabletop because I use it often and it makes the tool drawer a bit crowded. I don’t need to leave everything on the open shelf above where it gets dusty – now I only keep spray bottles and sizing etc. on the shelf above.

Ironing and rolling fabric in one step! And everything fits in the drawers!
I just need to clean up the used gravity-feed industrial iron I bought used years ago, and I’ll have totally finished my ironing upgrade!
I hope you find the above tutorial helpful and are inspired to build your own ironing table! Send me a photo or link if you do – I’d love to see!


Wow! Beautiful! Crafty! Useful! What a fine job you did!
Thank you! =)
Looks great. That should show up on the IKEA hackers website. Very nice. I have a basket of ironing and am on my way. :o)
Thanks! and I just submitted it to IKEAhackers a few minutes ago. =)
Nice tutorial. I love the tip about looking for silver fabric to cover your ironing board with. My off-white ironing board cover looks horrific — just like your bad example picture. lol
I will look for silver fabric next time! 🙂
I’m glad you like the step-by-step! =) Yes, you just can’t beat the non-staining aluminum coating on an ironing surface!
Great work! And really good looking, too. Your studio is so beautiful. ‘Anything worth doing is worth doing right’ — and you did it right!
For those who don’t have room for a permanent ironing table: Years ago I made an ironing table from a 18″ x 48″ piece of wood (actually, an old coffee table top) and five 13-ounce metal coffee cans, plus 10 plastic coffee can lids. By attaching 5 plastic lids to the underside of the board (one a few inches in from each corner plus one at the center), I could slip the cans into the lids for stability. The other lids went on the bottoms of the cans to protect my table top. The height of the cans was just right for raising the ironing surface to waist height when I put this contraption on my kitchen table. The padded and covered top (layers of cotton flannel padding plus layers of muslin, all ironed into place one at a time before stapling) could be stored behind a door when not in use. The cans, of course, had to “live” in a box when not in use, but I used this improvised ‘ironing table’ for ten years! I still use the padded top when ironing tablecloths and pillowcases. Ugly but Cheapo, and we drank the coffee. I wish I had known about bump cloth, or that you could buy silvered cloth. I would much rather live with your 60 inch, completely stable table with storage!
Thank you! =)
Your coffee can version sounds great too! The best thing about not having to attach my top permanently to the sideboard means, I can also take off the ironing top and store it if I want to use the sideboard normally again. My ironing surface would probably store easily behind a door as well.
What a great idea! Maybe I’ll do something similar in my sewing room Thank you for the inspiration!
You’re welcome – I’m glad you like it! =)
This is fabulous, Brooke (and by the way, I am so happy to see you back with a post. I was getting worried about you… I need to follow you on Instagram so I know you’re okay!). So much good information and great ideas in this post. You have certainly made the wheels in my head start turning!
Thanks, Karen! You deserve an ironing table for all those beautiful couture outfits you make yourself! Happy my post is giving you ideas. =)
My parents (especially my dad) usually keep up with my daily activities by spying on my Twitter & IG even though they don’t have accounts, hehe. It really is the best way to check on me because I can update both of those from my phone. I can’t believe how many back-to-back jobs I’ve been getting this year!
Fantastic! I would love a larger more stable ironing table but it will have to wait til I have an actual sewing room! Right now I have commandeered part of our family room. 🙂 Love the wall design… You did a great job on it Brooke!
Thank you! I hope you have a sewing room someday, but until then you could make a store-away ironing surface with a piece of plywood if you wanted. Mine could be taken on and off the sideboard if I needed to go back and forth between normal and sewing furniture. Just a thought. =)
This is brilliant – I love your sewing room updates! I just broke my ironing board (too much downwards pressure…), so a tabletop version sounds very timely 😉
Thanks! I’m thrilled my post was so timely for you! I hope you are able to upgrade to a sturdier table soon. =)
So nice to know you enjoy seeing my work space – there will be more to come once I have time to finish reorganizing everything else.
Wow – great hack! I love the outlines on the wall of your sewing room. Are they stickers?
Thanks & thanks! The dresses on the wall are Vera Wang sketches from a book that I projected on the wall, pencil traced, and then painted in.
I am so inspired with the things you make for your sewing room. I love your new ironing table.
Thanks so much! =)
Did you end up needing the full two yard of the aluminum coated fabric?
Yes, I needed 60 inches (length of my tabletop) plus enough to fold around the edge and staple to the underside. 72 inches (aka 2 yards) was just the right amount.
This is fabulous! Thanks for sharing how to do it.
Thanks! Glad you like the step-by-step! =)
Love it! If I ever have space for an ironing table, I want to make one. Thanks for the instructions! I’m soooo jealous of your sewing studio!
Thank you! I hope you have the extra space for one someday!
How heat resistant do you think the cover is? I’m looking at making a removable cover for my counter top, do you think the two layers of fabric would totally protect everything underneath?
I think it’s pretty heat resistant, but I would make a removable board using a piece of plywood like I did for my table just to be safe, especially if you have laminate counters. You could just cover a thin piece of plywood and put a non-slip rubber mat (like cabinet lining) under the removable board to keep it from sliding around.
Yet again you have created a wonderful solution! The added storage space is a bonus. Thanks for the Post!.
I’m so glad you like it! =)
what a wonderful and innovative idea. I am recently retired and can now devote more time doing what I love. My sewing room is a work in progress, this was my first project and I love it.Soon my once used bedroom will be my haven for fun and creativity. Gotta go now there is ironing to be done.
Thank you! A sewing room is always a work in progress! I’m so glad you like the ironing table idea – happy sewing and ironing! =)
Hi! I love this! I am currently getting ready to build my own ironing table with my dad 🙂 I just have one question. Do you use steam when you iron? Do you have to worry about the wood warping from the steam? Thanks!
Yes, I use steam (a lot). The bump cloth is what protects the wooden top from getting wet and warping. And I’ve never seen an ironing table in a costume shop that has any issues since everything dries out pretty fast because of using a hot iron on the surface. You might have trouble with the wooden top if you don’t use the bump cloth layer(s) though.
Have fun with your build! =)
Awesome!!! Thanks! I am totally taking your advice on fabrics. I will send pics when I get to it 🙂
I look forward to seeing yours!
That is a question I’ve been to which I’ve been seeking an answer, as well, but it’s never been properly answered until I came across this entry in your blog, Brooke! I do have a question about the bump cloth, though, is it so thick that the pressing surface isn’t as hard as one would want if one were pressing for quilting?
Renee –
Bump cloth is pretty dense. It makes a nice firm surface and it’s definitely harder than quilt batting. =)
What Is the name of the Vera Wang Book please? Love the walls and ironing board.
Thanks! The wall sketches are from the book “Vera Wang on Weddings”.
My husband made me this for Mother’s Day and I love it! Thanks for the tutorial!
Very cool! What a great gift and a wonderful husband! I hope you enjoy your new table for many years! =)
This is so nice! Have you noticed any warping issues with the solid wood top? I need a new ironing surface and this just might work!
No, I have not had any warping issues. =) And I’ve never worked in a shop that had any (most shop ironing tables are a padded & covered piece of plywood built like mine). The fact that I am never soaking the table in buckets of water is probably why it’s fine – steam and a little spray mist isn’t enough to do any damage, especially when I usually iron it dry as I work. Hope this helps!
Hi,
Excellent tutorial! I am planning on making a new ironing cover, I have never heard of or used bump cloth. So I was wondering if it is pinnable? I occasionally pin things in place on my ironing board, and hope to do so on the new cover, what is the weight and body of the fabric like? Thanks!
Erin –
Thanks! Bump cloth is just really thick fabric (see closeup photo of me pinching it between my fingers in my post above), so yes, you can pin through it. It isn’t stiff like homasote (the drywall material used on pinnable cutting tables), I’d describe it more like an extra thick wool felt with a little more drape than felt. I’ve pinned to my ironing table at home and the ones at work many times. =)
Good instructions. I am making three 2×4 foot boards to place on my bar area in my kitchen. That way I can use the number of boards I need for the project I am making. I am excited to get these started I will be able to place them horizontally or vertically side by side.
Thanks! Sounds like you’ll be making a great adaptation for yourself! =)
hey! I like you project. I wanna make a small ironing board like the white you have. can you tell em if you diy it or where can I buy one? thanks!
Hi, Miriam! The small ironing board is called a “sleeve board”. You can buy them at most fabric stores (usually next to the irons and hams) or you can order one from Wawak’s website.
I have seen others use cotton batting instead of the bump cloth. Do you think it matters?
Jan – Cotton batting may not hold up as well. Bump cloth is thicker and more uniform in thickness than cotton batting so you’d probably need more layers if you use batting, but it should work okay. I also seem to remember hearing that bump cloth is good about not retaining moisture, so it might keep the ironing surface less damp (and therefore less likely to mildew) when you use steam etc than basic cotton batting.
Hey Brooke,
I loved your IKEA hack, as I have been plotting an ironing/cutting board IKEA hack of my own! (I asked a question about bump cloth in a reply to an earlier question about bump cloth, but I’ll reiterate it here, just in case): When I iron I use Best Press starch and it tends to soak into the board and cause staining. I noticed you mentioned that bump cloth might keep things dryer, but everyone in sewing and quilting seems to stress the need for a firm pressing board. Will bump cloth make the board to soft?
I also wanted to compliment you on your ingenuity for projecting the Vera Wang images and then tracing and painting them in. And also huge fan love for responding to comments to years old posts!
Hi, Renee! Thank you so much! As I posted in reply above, bump cloth is pretty dense. It makes a nice firm surface and it’s definitely harder than quilt batting. I am all about the firm pressing surface when I iron!
Always happy to answer questions in comments people leave me! I love the feedback and interaction. Thanks for reading my blog! =)
This is the first time I had heard of bump cloth. I have been searching for better padding than batting. Thank you for some great information, and even several sources to get it. I got everything I needed to know about properly covering my board, and how to build a big board from this blog, and I really appreciate your expertise. I now have a new favorite blogger to follow. Thank you again for such good info.
Aww thank you so much! I’m so glad you like my blog! =) I really need to get back into the long-form blogging – instagram has made it too easy to do quick microblogging and I just haven’t had time to organize a real blog post in a long time.
Like so many others, I love your table. Thanks so much for the detailed tutorial. I’m thinking of doing something similar, and I was just wondering if the front of your legs bump the bottom shelf while you are ironing.
Thank you! I’m glad you like the tutorial. =) There’s enough of an overhang on the tabletop that I can lean right against the edge of the ironing surface and not touch any of the legs or shelves below. And like the kick-plate area under a kitchen cabinet, the bottom shelf is just above the floor so your feet don’t bump it.
Love this post- I just got the fabric in the mail, and I am wondering if I should wash it before I put together my ironing board. Does it need to be washed? Thanks!
Emilia – No need to wash anything before you cover the tabletop. That way it will shrink a little tighter when you steam it after it’s all put together. =)
Love this tutorial. I am planning to modify an existing table for ironing. However, I had a question about your rolling fabric. Onto what do you roll the fabric? I buy a lot of fabric but do not have a good way to store it. Thanks!
Elizabeth –
Glad you like the post! I roll some of my fabric onto cardboard fabric tubes – the kind of rolls the home decor fabrics and the more expensive bridal/formal fabrics are displayed on in fabric stores. You can use some wrapping paper tubes if they are long enough and sturdy enough, but I prefer the rolls meant for rolled fabric. I sometimes also use empty fabric bolts, but you have to fold the fabric in half before wrapping around those. Most of my fabric is stored in wire drawers and plastic tubs and I wash, press, and roll it when I’m ready cut it.
Pingback: studio: ironing table ikea hack — Lyric Art
Pingback: Sewing Room Organization: DIY Ironing Board | Alex Lynn Crafts
I just bought this exact piece at ikea “as is” yesterday with the intention to make it into an ironing station for my quilting. My husband was having trouble understanding what I wanted for this so he looked it up and found you. Thanks for your instructions, now my hubby can go ahead with constructing this for me.
Oh, cool! Glad your husband found my tutorial when he needed it! I hope you enjoy yours as much as I do mine. =)
Hi , Thankyou very much for posting this …very helpful and I’ll start making my pressing table very soon
I hope you enjoy yours as much as I enjoy mine! =)
I had never heard of bump cloth so I bought Insul-Bright to protect the wood since it is used for potholders and joypads. It’s very thin & wonder if I should still cover this with the bump cloth. Your thoughts.
Hi, Annalee! The first ironing boards were actually bare wood boards, so you don’t technically have to cover a board with anything if you don’t want to (lots of ironing tools are just sanded and unfinished wood). So it all depends on how hard a surface you like iron on.
I like my ironing surface to be firm and not something so soft that I leave an impression of the item I was pressing when I lift it off. (I use two layers of bump cloth because it has a nice dense quality similar to felt and isn’t exactly spongy.) If you use a lot of steam for tailoring and dress making, bump cloth will keep the moisture from building up so it isn’t always a damp surface. If you use a dry iron most of the time for things like quilt making, you might be just fine with what you have as it’s made for high temperature uses and shouldn’t melt.
Hope this helps! =)
Yes, a firm ironing surface is what I’m going for. I have been looking for the bump cloth. Not easy to find. Thank you for all your help
I was able to get some recently here https://www.onlinefabricstore.com/hanes-natural-classic-bump-drapery-interlining-.htm
I ordered it back in February I think, and I didn’t get it until May or June but I got it. They didn’t send me an email telling me they were waiting for it to be back in stock until I emailed them a couple months after to ask if it ever shipped. So just be aware they don’t necessarily ship quickly if you do decide to order from them. (They have a couple different kinds but you want the one without polyester in it like in the link.)