Since this year is strange and shocking in so many ways, I figured I would just add to the unexpected by actually sitting down at my computer to write a blog post! I hope all is well with you and you’ve found ways to make the most of life while everything seems to be stuck in limbo.
(If you’re curious what I’ve been up to for the past 5 years, you can surf my Instagram account. Teaser: I had my hands inside Dior dresses at a museum install last year!)
My seasonal full-time Opera Costume Shop work started back up as usual in February (after a two-month hiatus), and then a month later, a virus had shut the world down. It was a really good thing the shipment of locked costume hampers was late to arrive for the last big rented show of the season – since we never opened them, we didn’t have to do a complete inventory before sending it all back! As it was, we were able to walk away after doing a few weeks of in-house stock reorganizing & cleaning when the rest of the season was officially canceled.
As weird as life is for a lot of people this year, I’ve found that not much has changed for me personally. I’m used to long undefined breaks between jobs, and I was an expert in social distancing before it was cool. (My husband, thankfully, is able to work from home and he’s been busier than ever.) I found a few sewing projects to keep myself occupied with, and I can’t express how happy I am that I invested in a brand-new industrial straight-stitch Juki last summer! It has been soooo nice to have my “work” machine at home this year!
I named it Thor.
I made a few rainbow color-spectrum swirl skirts – one for myself, 2 have sold, and 3 have yet to sell. I also made 3 other swirl skirts (I’m calling them “color swipe swirl skirts”). I’ve claimed one for myself, but I still have 2 more for sale. Using up lots of fabric I already had for these!
If I ever get around to it, I’ll put them in my Etsy shop (I set it up years ago and have yet to list anything!) unless someone claims them before I list them. Email me if you’re interested in details.
Then I ended up drafting my own multi-sized face mask pattern because I had non-sewing friends who needed masks for work, and were having difficulty finding any that fit well:
You can’t go wrong with Star Wars or a solid color mask.
Masks for my friend who works at a cinema
Soon after that, I was making masks for family in Michigan:
And then I had a flash of brilliance to make my 5 year-old nephew a Teenage Mutant Ninja Turtle mask (of course, I wanted one for myself too):
And then it morphed into a few commissioned TMNT masks – mostly for adults:
This was the first batch that was half Mikeys. I made a couple more batches after this that evened up the numbers a bit.
Some people sent me photos:
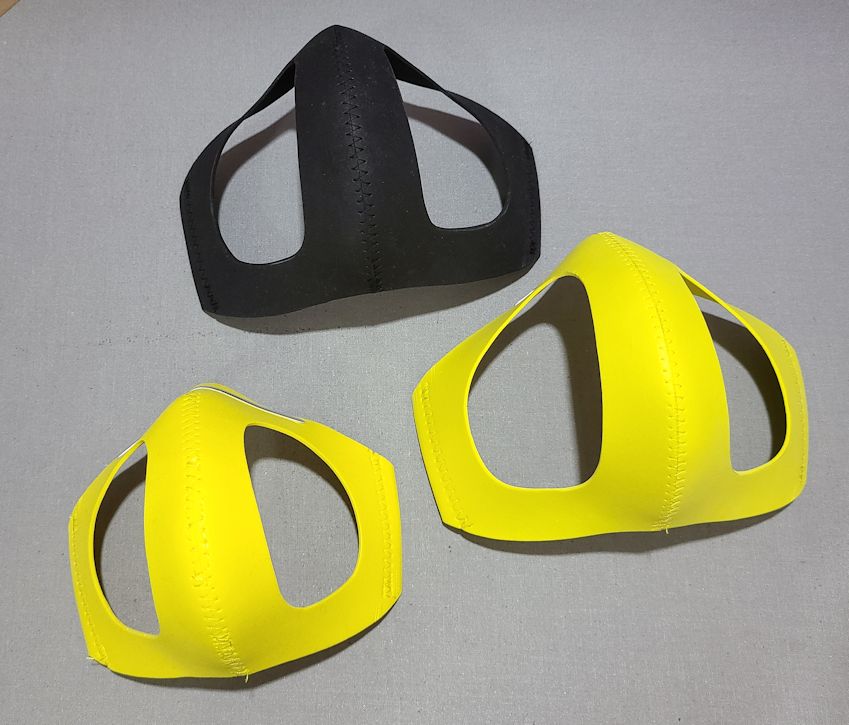
Fast forward to the end of summer when there doesn’t appear to be an end to the mask requirements, and I was inspired when I saw Jen’s craft foam mask frame on Epbot.
A mask that keeps everything away from your nose and month so you don’t feel like you’re eating it when you talk – yes, please! Being able to wear chapstick underneath is the cherry on top.
Face mask with craft foam frame underneath.
Ear-loops with Kam snap-attached cover.
Ear-loops with velcro-attached cover.
Here’s Jen’s full video tutorial:
I printed out her template, made a few modifications, slightly adjusted my self-drafted mask pattern to be the perfect fabric cover for it. I also graded the frame pattern to fit all my other mask sizes.
Mockups of original template on the left and my modified version on the right.
Stacks of prepped and cut mask frames.
Click the link below to download the pdf of my modified version of Jen’s frame and patterns for all sizes with fabric covers:
Use polyester thread (cotton-covered poly tends to cause problems and skip stitches)
Use a new needle – thinner is better (I used a 70/10 universal needle)
Set your zigzag stitch as wide as your machine goes and use a length of 2 or a tick bigger
Push the sides of the foam together and straddle the seam with the zigzag as you go
Start at the bottom of the V and sew out towards the edge, back-stitching at beginning & end
I stitch mine from the outside (side where the metal nose wire is stuck) and let it cup up around the back of the machine as I sew the seam. Then I carefully turn it right side out starting at the bottom edge. That way, the feed-dog tracks end up on the inside.
Stick-on nose wire added to the mask frame and velcro stitched before sewing center front seam. (Snaps can be put on before or after stitching.)
Stitching the center front seam of the craft foam frame.
The metal nose wire can then be carefully curved over your finger (don’t just bend it in half without a curve). I use stick-on nose wires instead of a paperclip sandwiched between two layers of craft foam.
Flat unbent nose wire.
Curved and bent nose wire.
If the bottom edge is a little bit off after stitching, you can trim the foam with paper scissors to even it up.
Some colors of craft foam stick to a regular metal presser foot more than other colors do. If you find that the foam isn’t feeding though your machine very well and at the right speed (stitches are really close together), use a Teflon/non-stick foot or put a piece of Scotch tape (the invisible “magic” kind) on the bottom of your regular foot. If your machine has the ability to reduce the presser foot pressure, that can also help.
I’ve been using either Kam snaps (this is the off-brand snap kit I have) or Velcro to attach the frames to the fabric mask covers. That way I can make mine with ear loops or around-the-head elastic. (See Jen’s video above for another style option using eyelets and removable around-the-head elastic.)
Kit of plastic Kam-style snaps.
Snaps and velcro on completed craft foam mask frames.
If you order packs of craft foam, you’ll need to air them out for a couple days by spreading them out. My living room smelled like a shoe store for a few days, but that goes away once the foam has been unwrapped for a while.
You will also need to test each color of craft foam to see if it bleeds! I found that only hot pink, royal blue, and dark purple (the worst!) bleed when soaked in hot water. If your foam bleeds in hot water, it will also bleed color onto your face when you wear it.
Soak a scrap of each color in hot water for at least 15 minutes.
Results of color bleed test after soaking.
I sealed the craft foam with an iron set to “cotton blend” like Jen’s video shows. It gets a little stiffer and shinier when you seal it:
Heat sealed (shiny) on the bottom, untouched craft foam on the top.
For my fabric covers, I sew the center front seams of both the outer fabric and lining fabric, Then I stitch the seam allowances down on both sides of the seam. No need to press the seam open with an iron because the machine will do that as you stitch.
If you want a nose wire pocket on the fabric cover, here’s the photo step-by-step of how I do that:
Fold bias rectangle in half, stitch both short ends, press, and turn.
Baste to the right side of the top edge of either the outside or lining fabric.
Then sew the outside to the lining (right sides together) at the top and bottom. Leave the sides open and turn through one of them. After turning, edge-stitch the top and bottom.
Sew outer mask to lining with the pocket sandwiched between the layers. After turning and pressing, the result will look like the photo.
Another view after lining is sewn to outer fabric.
Top-stitch edge of mask with pocket folded down to the inside (on the lining).
Stitch bottom edge and one side of the pocket through all the layers of the mask.
Fold and press ¼” to ⅜” to the inside on both sides. Then fold in another 1” and press. This will be the casings for elastic. Attach snaps or Velcro before sewing the casings down.
Sides pressed and snaps attached.
To save time, pre-make ear loop elastics (cut them around 9½” or so) and put them on before stitching the last seams. If the elastic ends up being too long, you can just re-knot it to fit the person wearing the mask. And the knot can be rotated to hide in the casing.
Inside of completed face masks with nose wire pockets.
You can even make the mask frames to wear loose under disposable masks or others you already have.
Craft foam mask frame under disposable mask.
Craft foam mask frames.
Craft foam frames can be hand-washed with soap & water as needed. Fabric covers can be washed & dried as normal laundry (just make sure you preshrink any fabric before making the covers).
The Sewing Sphere is the place to go if you’re looking to escape the frustrating algorithms and hang out with others who sew. It’s not all sewing, and it feels so much more connected in real-time than other social media platforms. It’s free to join – you can see posts and give “thumbs up” to posts you like. If you’d like to participate in comments and posting, you have to subscribe (help support what I do!) for a minimum of $2/month. I’ll be coming up with new things and sharing special content there. Come help me grow it into a great community – free from trolls & spam!
This summer, I’ve also been learning to tambour bead from my friend and fellow costumer Janet Gershenfeld, who was trained by the ladies who beaded Michael Jackson’s iconic glove! We have plans to offer couture beading services in the near future. I just need to finish building our website and we need to take care of a few boring business-y things.
This crazy year has given me the time to consider multiple career directions, and I’m looking forward to what the future brings!
I hope we don’t need masks much longer, but if we do, maybe my pattern and photos will help you build some you don’t mind wearing all day! And if you don’t sew and would like to commission some craft foam frames and/or fabric covers, email me.
Now that I’ve dusted off my blog a little, we’ll see if I can manage to post a little more regularly again. I really need to give it an overall freshening up!
Aww thanks! We’ll see if I can manage to post more regularly again – I have been reminded how long it takes to edit and organize photos!
I’ve been enjoying your blog in email form even though I haven’t been posting anything on my own blog. You always write about the most interesting things and I really appreciate all the time & hard work you put into it!


Nice I like the Turtles face mask! Great job!
Thank you! =)
I’m so glad you’re back! I missed you.
Aww thanks! We’ll see if I can manage to post more regularly again – I have been reminded how long it takes to edit and organize photos!
I’ve been enjoying your blog in email form even though I haven’t been posting anything on my own blog. You always write about the most interesting things and I really appreciate all the time & hard work you put into it!