Since this year is strange and shocking in so many ways, I figured I would just add to the unexpected by actually sitting down at my computer to write a blog post! I hope all is well with you and you’ve found ways to make the most of life while everything seems to be stuck in limbo.
(If you’re curious what I’ve been up to for the past 5 years, you can surf my Instagram account. Teaser: I had my hands inside Dior dresses at a museum install last year!)
My seasonal full-time Opera Costume Shop work started back up as usual in February (after a two-month hiatus), and then a month later, a virus had shut the world down. It was a really good thing the shipment of locked costume hampers was late to arrive for the last big rented show of the season – since we never opened them, we didn’t have to do a complete inventory before sending it all back! As it was, we were able to walk away after doing a few weeks of in-house stock reorganizing & cleaning when the rest of the season was officially canceled.
As weird as life is for a lot of people this year, I’ve found that not much has changed for me personally. I’m used to long undefined breaks between jobs, and I was an expert in social distancing before it was cool. (My husband, thankfully, is able to work from home and he’s been busier than ever.) I found a few sewing projects to keep myself occupied with, and I can’t express how happy I am that I invested in a brand-new industrial straight-stitch Juki last summer! It has been soooo nice to have my “work” machine at home this year!
I named it Thor.
I made a few rainbow color-spectrum swirl skirts – one for myself, 2 have sold, and 3 have yet to sell. I also made 3 other swirl skirts (I’m calling them “color swipe swirl skirts”). I’ve claimed one for myself, but I still have 2 more for sale. Using up lots of fabric I already had for these!
If I ever get around to it, I’ll put them in my Etsy shop (I set it up years ago and have yet to list anything!) unless someone claims them before I list them. Email me if you’re interested in details.
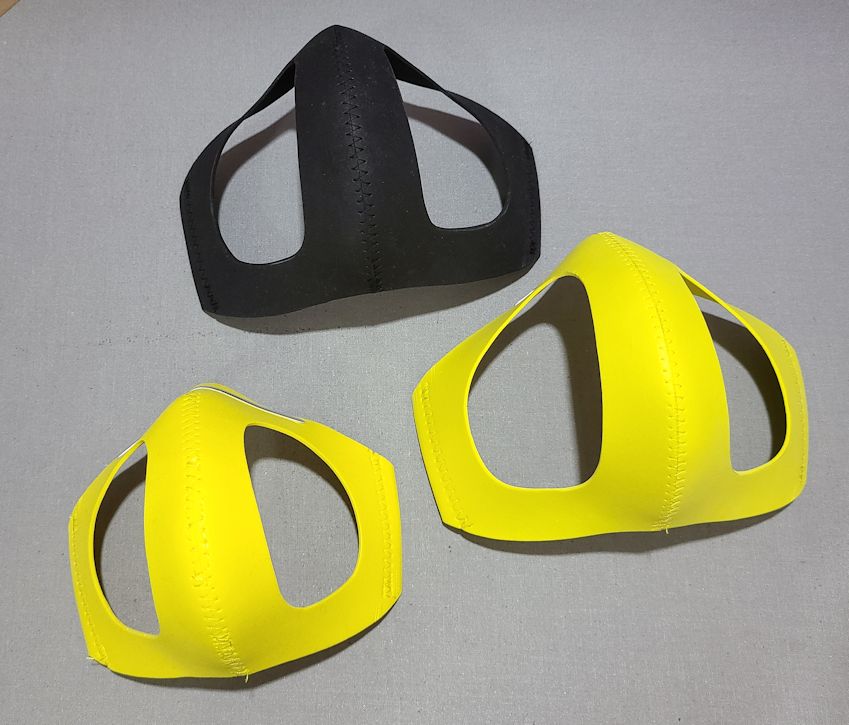
Then I ended up drafting my own multi-sized face mask pattern because I had non-sewing friends who needed masks for work, and were having difficulty finding any that fit well:
You can’t go wrong with Star Wars or a solid color mask.
Masks for my friend who works at a cinema
Soon after that, I was making masks for family in Michigan:
And then I had a flash of brilliance to make my 5 year-old nephew a Teenage Mutant Ninja Turtle mask (of course, I wanted one for myself too):
And then it morphed into a few commissioned TMNT masks – mostly for adults:
This was the first batch that was half Mikeys. I made a couple more batches after this that evened up the numbers a bit.
Some people sent me photos:
Fast forward to the end of summer when there doesn’t appear to be an end to the mask requirements, and I was inspired when I saw Jen’s craft foam mask frame on Epbot.
A mask that keeps everything away from your nose and month so you don’t feel like you’re eating it when you talk – yes, please! Being able to wear chapstick underneath is the cherry on top.
Face mask with craft foam frame underneath.
Ear-loops with Kam snap-attached cover.
Ear-loops with velcro-attached cover.
Here’s Jen’s full video tutorial:
I printed out her template, made a few modifications, slightly adjusted my self-drafted mask pattern to be the perfect fabric cover for it. I also graded the frame pattern to fit all my other mask sizes.
Mockups of original template on the left and my modified version on the right.
Stacks of prepped and cut mask frames.
Click the link below to download the pdf of my modified version of Jen’s frame and patterns for all sizes with fabric covers:
Use polyester thread (cotton-covered poly tends to cause problems and skip stitches)
Use a new needle – thinner is better (I used a 70/10 universal needle)
Set your zigzag stitch as wide as your machine goes and use a length of 2 or a tick bigger
Push the sides of the foam together and straddle the seam with the zigzag as you go
Start at the bottom of the V and sew out towards the edge, back-stitching at beginning & end
I stitch mine from the outside (side where the metal nose wire is stuck) and let it cup up around the back of the machine as I sew the seam. Then I carefully turn it right side out starting at the bottom edge. That way, the feed-dog tracks end up on the inside.
Stick-on nose wire added to the mask frame and velcro stitched before sewing center front seam. (Snaps can be put on before or after stitching.)
Stitching the center front seam of the craft foam frame.
The metal nose wire can then be carefully curved over your finger (don’t just bend it in half without a curve). I use stick-on nose wires instead of a paperclip sandwiched between two layers of craft foam.
Flat unbent nose wire.
Curved and bent nose wire.
If the bottom edge is a little bit off after stitching, you can trim the foam with paper scissors to even it up.
Some colors of craft foam stick to a regular metal presser foot more than other colors do. If you find that the foam isn’t feeding though your machine very well and at the right speed (stitches are really close together), use a Teflon/non-stick foot or put a piece of Scotch tape (the invisible “magic” kind) on the bottom of your regular foot. If your machine has the ability to reduce the presser foot pressure, that can also help.
I’ve been using either Kam snaps (this is the off-brand snap kit I have) or Velcro to attach the frames to the fabric mask covers. That way I can make mine with ear loops or around-the-head elastic. (See Jen’s video above for another style option using eyelets and removable around-the-head elastic.)
Kit of plastic Kam-style snaps.
Snaps and velcro on completed craft foam mask frames.
If you order packs of craft foam, you’ll need to air them out for a couple days by spreading them out. My living room smelled like a shoe store for a few days, but that goes away once the foam has been unwrapped for a while.
You will also need to test each color of craft foam to see if it bleeds! I found that only hot pink, royal blue, and dark purple (the worst!) bleed when soaked in hot water. If your foam bleeds in hot water, it will also bleed color onto your face when you wear it.
Soak a scrap of each color in hot water for at least 15 minutes.
Results of color bleed test after soaking.
I sealed the craft foam with an iron set to “cotton blend” like Jen’s video shows. It gets a little stiffer and shinier when you seal it:
Heat sealed (shiny) on the bottom, untouched craft foam on the top.
For my fabric covers, I sew the center front seams of both the outer fabric and lining fabric, Then I stitch the seam allowances down on both sides of the seam. No need to press the seam open with an iron because the machine will do that as you stitch.
If you want a nose wire pocket on the fabric cover, here’s the photo step-by-step of how I do that:
Fold bias rectangle in half, stitch both short ends, press, and turn.
Baste to the right side of the top edge of either the outside or lining fabric.
Then sew the outside to the lining (right sides together) at the top and bottom. Leave the sides open and turn through one of them. After turning, edge-stitch the top and bottom.
Sew outer mask to lining with the pocket sandwiched between the layers. After turning and pressing, the result will look like the photo.
Another view after lining is sewn to outer fabric.
Top-stitch edge of mask with pocket folded down to the inside (on the lining).
Stitch bottom edge and one side of the pocket through all the layers of the mask.
Fold and press ¼” to ⅜” to the inside on both sides. Then fold in another 1” and press. This will be the casings for elastic. Attach snaps or Velcro before sewing the casings down.
Sides pressed and snaps attached.
To save time, pre-make ear loop elastics (cut them around 9½” or so) and put them on before stitching the last seams. If the elastic ends up being too long, you can just re-knot it to fit the person wearing the mask. And the knot can be rotated to hide in the casing.
Inside of completed face masks with nose wire pockets.
You can even make the mask frames to wear loose under disposable masks or others you already have.
Craft foam mask frame under disposable mask.
Craft foam mask frames.
Craft foam frames can be hand-washed with soap & water as needed. Fabric covers can be washed & dried as normal laundry (just make sure you preshrink any fabric before making the covers).
The Sewing Sphere is the place to go if you’re looking to escape the frustrating algorithms and hang out with others who sew. It’s not all sewing, and it feels so much more connected in real-time than other social media platforms. It’s free to join – you can see posts and give “thumbs up” to posts you like. If you’d like to participate in comments and posting, you have to subscribe (help support what I do!) for a minimum of $2/month. I’ll be coming up with new things and sharing special content there. Come help me grow it into a great community – free from trolls & spam!
This summer, I’ve also been learning to tambour bead from my friend and fellow costumer Janet Gershenfeld, who was trained by the ladies who beaded Michael Jackson’s iconic glove! We have plans to offer couture beading services in the near future. I just need to finish building our website and we need to take care of a few boring business-y things.
This crazy year has given me the time to consider multiple career directions, and I’m looking forward to what the future brings!
I hope we don’t need masks much longer, but if we do, maybe my pattern and photos will help you build some you don’t mind wearing all day! And if you don’t sew and would like to commission some craft foam frames and/or fabric covers, email me.
Now that I’ve dusted off my blog a little, we’ll see if I can manage to post a little more regularly again. I really need to give it an overall freshening up!
I honestly did not mean to take such a long break (a full year!) from blogging – where did 2015 go??
For the first few months of the year, I was finishing up the second half of the season at The Dallas Opera and the long commute across town eats about 3 hours each day. So, needless to say, blogging at the end of a day didn’t hold much appeal.
When the opera season wrapped up at the end of April, I unexpectedly found the motivation to do a bunch of sewing for myself – I was whipping up a lot of things I had been wanting to make myself and didn’t want to risk losing enthusiasm by stopping to blog. (I did Instagram most of it though so I have a few crummy selfies & construction shots.)
(as usual, click to enlarge)
My husband and I were also slowly working our way through a home office makeover on the weekends from the middle of February to the end of May. So the computer wasn’t properly set up at times during the DIY mess.
We now have a large standing desk instead of two separate desks on opposite sides of the room.
And then the phone rang with a job offer and I was driving over to Louisiana on Memorial Day to work on a TV series filming in Baton Rouge.
I was promised a week of work. I packed for a month.
Television shooting schedules are a bit insane. I worked at least 12 hours a day and even worked one 18-hour day in the costume shop at the production office. (So glad I wasn’t working on set in the humid Louisiana summer heat!)
It was the middle of week 5 before I found myself driving home. I’ve worked in the film world long enough to know that once someone puts you to work and you don’t fail spectacularly, they will try to keep you as long as possible.
The day after I got home, a collarless pug showed up at my door. Luckily, I was able to track down the owner by the next afternoon thanks to DFW Pug Rescue. (If she had been chipped, it would have been easier – please have your pets micro-chipped!)
Wensley wasn’t pleased to have a visitor but he tolerated her.
I think I spent about a week just staring at the wall after everything got back to normal.
And a couple weeks later, I found myself going back to Baton Rouge. Good thing I hadn’t bothered to unpack my sewing machine from the first trip!
I only let them have me 2 weeks, and then I came home again.
I had about a month before the new opera season started, so I tried to finish up a bedroom makeover I had started between Louisiana trips.
I recently made myself a new wool coat during daily breaks at the opera. And I even managed to get photos! I’ve been working on a blog post about the coat, but I decided to briefly put it aside because I found a TV promo of the show I worked on in Louisiana.
So here’s the first tiny (and I mean tiny) peek at a ball gown I miraculously cranked out in only 6 days, at about the 0:27 mark. You mostly just see the petticoat someone else made.
UPDATE 6/4/16: The original teaser I linked to disappeared, but I found a full length trailer instead. The ball gown is now at about the 1:48 mark:
Underground premieres March 9, 2016 on WGN for those of you who are interested in watching it.
Aside from a couple other projects that I’ll be able to talk more about in the coming months, that pretty much sums up my 2015.
I promise my next blog post will not be a year away!
Over the summer, I was part of a small team of costumers that helped build some walk-around character costumes for a Christmas parade at Silver Dollar City in Branson, Missouri.
It had been years since I had helped make true mascot type costumes, so it was a fun break from the norm and a good reminder of why I don’t want to do this kind of sewing all the time. Foam, fur, curved needles, and seriously wacky pattern pieces – give me real clothing any day!
Radioactive looking shiny lime green stretch crushed velvet. Lime green is my favorite color but this fabric causes some retinal burn-in when you look at it too long!
We constructed 2 moose heads that perched high (as in 12 feet high!) atop giant Santa hats, 2 big candy canes, and 2 elves that looked like Christmas tree ornaments. All were based on the designer’s sketches and completed with hundreds of LEDs.
There was lots of stretch crushed velvet and glittery stretch velvet for me to create striped yardage from.
All those stripes are why I met Spray n Bond and we became good friends.
And I shoved large amounts of foam fabric through a small domestic sewing machine. I was really wishing I had a long arm machine to use for this!
I had to do some of the sewing standing up so I could see what I was doing over all that bulk!
Moose head construction.
Moose ears all in a row.
The moose ears made nice bunny ears too. I kind of want some!
I love this selfie with the ears so much it has been my Twitter avatar since I took it. (I’d use it for my Gravatar too if so many blogs didn’t do circle style avatars – it just doesn’t work as a circle.)
It’s a little weird to have your work stare back at you while you hand-stitch its ear on.
“I’m looking at you!”
I have tons more photos, but it’s more interesting to watch video because you can see all of the lights and get a better sense of the size. I was actually one of the test models for the elf costumes in order to help work out some of the awkwardness of wearing them – glad to see that no one was tripping and falling during the parade!
Happily, there were plenty of YouTube videos posted of the parade for me to choose from. (Ironically, the official Silver Dollar City one was not the best and was filmed on a night when not all the lights were working.) So I’ve chosen two of the best videos.
(See timestamps below each if you want to fast forward through them.)
This first one is nice for closeups:
1:14–1:32 Moose heads on giant Santa Hats
2:22–2:38 Big Candy Canes
3:00–3:33 Elves that look like huge Christmas ornaments
And this video is a view of the parade from a little farther back, giving you a better look at the whole 12-foot moose on Santa hats costumes:
0:48–0:59 Moose
2:33–2:52 Candy Canes
3:19–3:42 Elves
This year has been full of Christmas projects for me! And I still have one more to post about next time!
I’m sorting through photos for a couple more Christmas costuming posts, which I’m hoping to have up before New Year’s, but in the meantime, I have to share this wonderful video!
The same friend & coworker who sent me the link to the amazing Dior video also sent me this one a few weeks ago. (Thank you, Matt!)
The undergarments required for a proper period silhouette are often a bit unfamiliar to us in modern times. So many layers! And if you’ve ever wondered what pregnancy fashions looked like in the 1800s, there are a couple examples.
I hope you enjoy this beautifully simple film about historic dresses and all the layers beneath!
There was a little blood (on the white fur, of course! but easy to fix), a lot of sweat (heavy upholstery fabric is hard to wrangle!), but thankfully, no tears for this build!
I ended up having to sort through 415 photos for this post! Needless to say, I have reduced that number down a little bit. (Click photos to enlarge.)
Back at the end of September, I was hired to build dresses for two identical mannequins for a revamped outdoor Christmas display in Wichita Falls. The request was for something that resembled the red satin dresses with white fur trim seen at the end of the 1954 movie White Christmas.
Luckily, it’s a movie I love and own so I was able to re-watch the end a bunch of times and grab some good screenshots to work from.
One of the mannequins was brought to my house.
I called her Keira. She was about the same dress size as I am – but 6 feet tall! A GIANT Barbie.
Her old outfit was sad and her wig was scraggly. So I threw away her clothes and let her borrow some of mine after a bit of a spa day.
I ordered a swatch of the Sunbrella brand red outdoor upholstery velvet. It ended up being the perfect color and had a decent drape, so I ordered 16 yards (but it seems to be sold out at the moment – not sure if they will restock it, but I hope they do!).
I bought some rip-stop nylon for lining and some white acrylic fur with an olefin backing at my local Hancock Fabrics. I also purchased outdoor upholstery thread, acrylic rhinestones (JoAnn Fabrics), and fabric glitter glue (Hobby Lobby).
I ordered hoop skirt petticoats from Petticoat Junction and the client ordered ice skates for shoes. I bought some red “parade gloves” at a Halloween store (perfect timing of a project!).
My really good friend Marlene, who is a professional film & television makeup artist, was tasked with finding and styling some appropriate wigs that could stand up to the elements.
I thought Keira might like to sit down for once in her life. Not sure it worked out so well for her.
Wensley did not like Keira and hated it when I touched her or moved her around. I think she bothered him because she wouldn’t look at him, hehe. (My dress forms don’t have faces so he just ignores them.)
There was growling and barking for many days after she arrived. Just when he had gotten a little used to Keira visiting, the big roll of velvet fabric arrived and he greeted that with the same suspicious “intruder alert!” and I caught it on video:
My husband and our brother-in-law helped me rig a stand for her, and then I was able to start working on a mockup.
My starting point for both bodices was Vogue 2979 that looks like a reproduction of Grace Kelly’s wedding dress (pictured in this old post). But the sleeve caps as drafted were too short and caused all kinds of fit issues until I popped the seam open at the shoulder. (I tried the bodice on myself and had similar problems with the fit, so beware if you are trying to use this pattern straight from the envelope.) I also lowered the underarm curve a slightly like I usually need to do for myself.
Therefore, I drafted my own sleeve from scratch and made it a two-piece sleeve while I was at it. This allowed me to include better elbow ease for Keira’s perpetually bent arms. It also made it so much easier to dress her.
Original sleeve (left) and new self-drafted 2-piece sleeve (right).
My friend used glossy red model paint to repaint Keira’s outdated ‘80s lips (check out that unbelievably sharp line!) and Keira got her lovely new hair. So much better!
The skirts were just basic full circles (but huge! because she’s so tall!) and I draped & drew the cape pattern on Keira. I was really surprised that the upholstery velvet cooperated and did what I wanted it to do for the most part.
I didn’t have enough fur (I bought all there was at the store) to double fold it like I wanted to on the capelet and skirts, so I lined it with some white polyester utility fabric and did a lot of picking to pull the fur out of the seams.
After making stitch samples, I determined that hand-stitching looked no better than a machine stitched blind-hem. Machine sewing FTW! Much more convenient than sewing miles of circle by hand!
My husband found Keira’s old hairdo.
Attaching the fur trim to the skirt. And then starting again for skirt number 2.
So I’m hemming the 2nd skirt while listening to Glee Madonna album and I come out to find this. It’s 1983 all over again! I took Keira’s wig off to remove her skirt & my husband put his hat on her head.
Husband stikes again but with a silly hat.
The skirts ended up being so heavy I had to add bars to the bodices and corresponding hooks on the skirts to hold them in place.
If you have questions or would like to know about specific details, ask me in the comments. =)
Overall, I probably spent about 3 weeks total on this project but the work was spread out over about 6 weeks. It was a huge build to complete on my own and I was so glad when it was finished! So was Wensley.
“Good, that weird lady who wouldn’t look at me is gone!”
Merry Christmas to all, and my all your Christmases be white!
I have so many things to share! This is going to be a bit of a hodgepodge post.
Some of you may already know from talking to me directly or seeing it on Twitter, I no longer work part-time at Fabrique Fabrics. It was fun for the year and a half it lasted and I’ll miss my coworkers, but since it was never really my “career” I’m not really upset about it. (I think everyone who knows the details is more upset about it than I am.) The short explanation is my boss decided to reduce my hours to “none” to save some money, so I’m moving on to other things instead of waiting around.
On to more exciting things (and LOTS of links)…
Something I worked on last summer will finally be on display at the Dallas Arboretum for the holidays! The 12 Days of Christmas exhibit is “an elaborate collection of life-size Victorian gazebos filled with the charming costumed characters made famous by the beloved Christmas carol.”** You can see it for yourself from November 16, 2014–January 4, 2015. Since the opening was delayed a year, I’m looking forward to remembering what I did. I can’t wait to see it installed and share some photos (and possibly video) once it opens!
I helped make some youth circus costumes back in May. Lots and lots of tiny appliqué (spandex on spandex) and ruffles… and thread! I really blew through the thread on this project:
Circus costumes with detailed appliqué designs and what the trashcan next to my machine looked like halfway through.
And here’s a teaser video of this year’s show, in which you can see some of the costumes in motion:
If you will be in San Antonio this weekend (September 26-28), you can see some of the fun costumes I helped build this summer in the opera The Fantastic Mr. Fox put on by the new Opera San Antonio.
More of my summer sewing work will be in a Christmas parade at Silver Dollar City in Branson, Missouri this year.
Hopefully, I will have more photos of both the opera and the parade to share later. (I’m crossing my fingers that someone will post a video of the parade on YouTube at some point!) Update:Post about the parade.
If you will be in Dallas, TX anytime now until October 5, go see the Oscar de la Renta exhibit at the George W. Bush Presidential Center. It’s fashion inspiration! I went and took a ton of photos a few weeks ago, so if you aren’t able to see it yourself, I promise a detailed blog post about it soon. Here’s a teaser:
Oscar de la Renta – Five Decades of Style exhibit
I also intend to go see the American Brides exhibit at the Texas Fashion Collection museum of the University of North Texas, in Denton. The exhibit is running through October 24 of this year, so I still have a few more weeks to get there.
Recent freelancing has suddenly gone from “absolutely nothing” to “I’m booked into the beginning of next year!” Such is my career.
I’m currently working on some dresses à la White Christmas for a couple of mannequins that are part of the annual Fantasy of Lights in Wichita Falls, TX. That will make three Christmas displays that I’ve worked on opening this holiday season! Update:See the finished dresses in this post.
Meet Keira, one of the mannequins I’ll be making a custom dress for. She’s had a hard life and it’s time for new hair and better clothes.
Then it looks like I’ll be finishing out the year working at The Dallas Opera. They have a few new costumes to build. =)
And just because I’ve been looking for a place to share a couple of great costuming videos, I’m going to include them here.
I found the first video because of the second one. It is a really nice overview of what it’s like in any professional costume shop – whether it’s opera, theatre, dance, or film – when there are costumes to construct and fit. “Recreating a Tutu” at the New York City Ballet:
And if you have the time to watch (it’s over 26 minutes long), the following is a truly fascinating video on how a ballet pointe shoe is made (teaser-not-quite-spoiler: inside out!). If you don’t have time to watch it now, come back and watch it later when you do! I promise you will enjoy it.
They use some cool sewing machines and do an amazing amount of the work by hand. And to think that all shoes used to be made this well! “What’s in a Ballet Shoe”:
** What my husband/editor read at first glance: “An elaborate collection of life-size Vulcan gizmos filled with charred costumed characters made famous by the beloved Christmas carrots” ??
Did I leave you hanging in suspense about which was the lie in the list from my previous post? From the people who decided to guess, the results were pretty evenly distributed across the three choices.
The logic some of you used to make your choice was really quite good! I had fun reading your guesses.
So without further ado (and in no particular order), here are the rest of the stories:
I once won a three-legged race – without falling down!
TRUE!
Yes, I did in fact win a three-legged race. And yes, my partner and I did it without falling down… while running!
I was in 4th grade and we had a school track & field day, Olympic-type games & events, and competed as classes. We knew ahead of time which events we would be competing in, so my friend and I decided we would practice for the race during recess. I remember classmates being amused as they watched us casually walk around the schoolyard with our legs tied together.
The training really paid off because we could move together without thinking about it by the time we had to race. We got so good at it, the day of the race, we sprinted to the finish line only to turn around and realize everyone else was still at least half the field behind – and most of them were stumbling or already lying in awkward 3-legged heaps along the way.
I have no photographic evidence of that day (I can’t remember if we were even awarded actual ribbons) so you’ll just have to take my word for it.
Batgirl is my cousin.
TRUE!
Surprised? You see, Yvonne “Batgirl” Craig is in fact my cousin. My second-cousin-once-removed to be exact. Stated another way, my mom’s grandmother and her grandmother were sisters.
I’ve never actually met her, but there have been a few emails back and forth between my mom/mom’s sister and some of the family on the other branches of the tree. I remember watching reruns of the Batman TV show as a kid and thinking she was so cool. Now when I watch the show, I wish I had all of Barbara Gordon’s clothes in my closet!
I love country music.
LIE!
When asked what kind of music I would like to listen to, I always answer “anything but country or rap.”
I have very eclectic taste in music. I grew up listening mostly to classical and ‘50s & ‘60s Oldies. My music collection contains a little of everything – Big Band, The Beatles, The Monkees, ABBA, The Beach Boys, Michael Jackson, Broadway musicals, movie soundtracks, techno, synthpop, and mp3s of miscellaneous songs from almost every decade up to the current year just because I like them or have memories associated with them. (Some of the songs in my collection aren’t even in English.)
I can listen to pretty much anything, however, if you make me listen to more than a couple of country songs in a row, I will become more and more irritated. The general whiny sound of modern country music and the style of singing that accompanies it just plain annoys me. There are exceptions, but very few of them.
The one artist I never, EVER get tired of listening to is Owl City. I can go for weeks playing those CDs and nothing else without tiring of them – Adam’s songs just sound happy and have such clever, poetic lyrics full of puns and double entendres that I’m surprised I can sometimes still hear something “new” when I’ve practically worn those discs out.
There’s even an Owl City song that mentions a sewing machine and sewing “miles and miles of thread… in navy and red” :
Hope you enjoyed this bit of blogging fun & games!